Overclock.net banner
1 - 20 of 21 Posts

NoobasaurusWrex

· Registered
Joined
·
136 Posts
Discussion starter · #1 · (Edited)
Hey All,

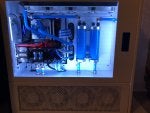
After nearly 3 months, my SMA8 Revision A finally arrived. I have been sitting on my parts since nearly November just waiting to get this build started, and finally, it's time! While I have tried to put some thought into how to run the tubing in this case over the waiting period, the unfortunate truth of this case is that just about everything feasible has been done before. As such, it's somewhat difficult to come up with fresh ideas. As long as it looks good, I guess I can live with that!

Edit: The Cryo-Chillz coolant seemed to work okay, but the mica fell out after only about 3 days. After that, it was just a plain translucent blue coolant, so I decided to go back to Mayhems pastel blue. The thermals were much better (7c idle, 10-15c while gaming). I also replaced the set of right angle fittings leading up to the CPU rad with bent tubing which greatly increased flow in that loop, which may have contributed to it as well.

Day 1 Images: https://imgur.com/a/WiIbm
Day 2 Images: https://imgur.com/a/gB4co
Day 3 Images: https://imgur.com/a/p67F8
Day 4 Images: In the comments below

Base Components
  • Motherboard: Asus Maximus Hero X
  • CPU: Intel 8700k (delidded@5.0GHz)
  • RAM: Corsair Dominator Platinum32GB
  • Disk: 2x Samsung 960 1TB NVMe EVO SSDs
  • GPUs: 2x EVGA 1080ti SC Black Editions
  • Sound: Creative SoundBlaster Z (May not get used)
  • Power Cables: Custom CableMod cables (White/Corsair Blue)
  • Power supply: SeaSonic 1200w Platinum Modular Power Supply

Watercooling Components
  • CPU Waterblock: EK-FB Asus M9H Monoblock - Nickel/Plexi
  • GPU Waterblocks: 2x EK-FC Geforce GTX Nickel/Plexi
  • GPU Backplatess: 2x EK 1080ti Backplates (Black)
  • Radiators: 2x Alphacool XT45 (480 top push/pull, 560 bottom push only)
  • Fans: 8x EKWB Vardar EVO 120 (White, Top Rad), 4x EKWB Vardar EVO 140 (White, Bottom Rad), 3x EKWB Vardar EVO 140 (White, Front intake), 3 x EKWB Vardar EVO 120 (White, 1x Rear Exhaust, 2x bottom compartment rear exhaust)
  • Reservoirs: 2x Singularity PCs Protium 200ml -- Silver/Polished (medium)
  • Reservoir Mounts: 2x Singularity PCs Ethereal Dual V3 - Silver
  • Pumps: 2x EKWB EK-XTOP Revo D5 (Sleeved)
  • Pump Mounts: 2x EK-UNI Pump Bracket (140mm Fan) -- For mounting to the back of the lower rad
  • Fittings: EK HDC 16mm Fittings (Nickel), EK-ACF fittings for soft tubing in the basement and behind the MB tray), Various EK angled, block, and ball valve fittings mostly for the basement (Nickel/Black Nickel)
  • Tubing: 16mm OD PETG, EK DuraClear 16/11 Soft Tubing
  • Coolant: UFO Technologies Cryo-Chillz -- Cobalt Blue

Misc Components
  • Cleaning Kit: Mayhems Blitz P. 1 and 2
  • PWM Hubs: 3x Silverstone PWM Fan Hubs
  • RGB Light Strips: 6x SilverStone Technology RGB LED Strips
 

Attachments

Discussion starter · #2 ·
Day 1: Got the case together and the Rads/Fans installed. Drilled and tapped holes for the res mounts and mounted them appropriately. All of this took longer than I thought it would, but it was great progress for one evening. Tomorrow I plan on figuring out tubing for the reservoirs and getting my pumps mounted. Once that is finished, I'll break out the step bit and start drilling for pass through fittings in the mid plate and potentially the back wall of the case.


Imgur Gallery of today's progress: https://imgur.com/a/WiIbm
 

Attachments

Discussion starter · #3 ·
http://www.overclock.net/forum/attachment.php?attachmentid=92641&thumb=1

Day 2: Lots of drilling and tubing planning today. Drilled the pass through holes for the reservoirs and got the pumps installed on to their mounts. Decided to drill a pass through for a return for the GPU loop at the front of the case as well. Waiting on some miscellaneous fittings and fans to come in tomorrow that I didn't originally plan for. Once those come in, I'll start running the soft tubing in the basement and drain my old rig in preparation to swap the parts in to this build.

Full gallery of today's work here: https://imgur.com/a/gB4co
 

Attachments

I see you choose the 140.2 rad mount over the vertical front 120.3 rad mount. I’m torn on this myself. The 140.2 mount lets you use bigger, quieter fans (and by default less fans). However, the 120.3 mount covers the upper compartment better from top to bottom and has 10% more surface area for cooling. Just curious, why did you personally select the 140.2 mount?
 
Ahh interesting. I've subbed.

I am waiting for my SMA8-A to be delivered. I'm also using Singularity Reservoirs. Looking forwards to seeing what you will be doing. Already significant differences besides the reservoirs.

Best of luck with it.
 
Discussion starter · #6 · (Edited)
I see you choose the 140.2 rad mount over the vertical front 120.3 rad mount. I’m torn on this myself. The 140.2 mount lets you use bigger, quieter fans (and by default less fans). However, the 120.3 mount covers the upper compartment better from top to bottom and has 10% more surface area for cooling. Just curious, why did you personally select the 140.2 mount?
I actually didn't -- I originally had ordered the 140.2 mount by mistake since at the time there weren't good explanations or pictures of the accessories. I later emailed customer support asking them to change it to the 120.3, which they did -- but when the case shipped it had the wrong mount. Rather than delaying the build any further, I just installed it and threw 2 fans in it. I emailed support to get the correct mount shipped, but their email support hasn't exactly been responsive as of late.

The 240 mount seems to work fine for the moment. More pictures to come. My system was down for a day while I transferred the parts from the old case.
 
Discussion starter · #7 ·
2 updates today, since my PC was down all day yesterday while swapping the parts over.

http://www.overclock.net/forum/attachment.php?attachmentid=94977&thumb=1

Day 3: Finished up the tubing in the basement. The fit was really tight with the pumps mounted to the two EK brackets, but I made it work somehow. I found that you quickly run out of space under there once you add drain tubing and wiring. Its a mess so I'm not sure I want to share images of it.

Got the motherboard swapped over and the monoblock installed and drilled 3 more pass throughs -- 2 for the video cards, and one to route fluid through the center panel of the case. I cut some of the tubing for the reservoir connections to the pass throughs in the bottom of the case as well as the bottom tubes for the video card. I got the fan brackets installed and put the fans that arrived in. The work has been exhausting, so I cut my night short and decided to call it a night and continue in the morning.

Day 3 gallery (I apparently didn't grab a picture of the basement): https://imgur.com/a/p67F8
 

Attachments

Discussion starter · #8 ·
Day 4: The home stretch. Started by getting my fan controllers installed behind the case and doing the basic necessities like connecting the front panel switch, USB lines, audio, etc. I ended up cutting new tubes for the video card connections because I felt all of them were too short and I didn't feel comfortable leaving them that way. Burned through 2 packs of 500mm tubing just to get it right.

I wanted to keep the fittings to a minimum and only do bends if possible, but some of the angles made that near impossible -- like the output on the monoblock up to the radiator in the top. There just wasn't enough room to make it, so I ended up using a 30mm extension fitting and 2 90 degree rotary fittings as a compromise. Thankfully, it doesn't look terrible. I also decided I may as well use another 30mm extension and right angle fitting to make the return line to the reservoir in the CPU loop a little easier. I did manage to get a nice bend on the return line from the GPU loop though, so there's that, as well as for the line connecting the CPU input to the pass through fitting in the center of the case wall. It will really help to show the coolant off.

After the tubing was finished, I got my fan controllers all rigged up, albeit sloppily for now, and ran the CableMod cables. They are in serious need of training and I have been struggling to get them to look nice, in the case of the GPU cables. I'll have to do some work on that tomorrow. Moved on to leak testing with a spare PSU and distilled water. Turns out some of the fittings were a little loose, so I popped a couple of leaks -- one at a fitting on the top rad, and another on a fitting coming out of the CPU loop pump. A couple of quick twists fixed that. After letting it run for about 20 minutes, I was satisfied. I drained both loops and filled them up with Blitz part 2 to start the cleaning process.

Once the Blitz was in, I did some preliminary cleanup cable management, but it still isnt where I want it to be. I'll work on that tomorrow. I mounted the LED strip mounts and threw on 2 of the LED strips to get some lighting in, then plugged the power cables into the power supply and installed it. I'm going to leave the PC on overnight with the blitz in it to complete the treatment, do the flushes tomorrow, then pour in the coolant.

I'm just going to attach the pictures from today on this post since there aren't many.

http://www.overclock.net/forum/attachment.php?attachmentid=95001&thumb=1
 

Attachments

Discussion starter · #10 ·
Day 5: Build complete!

Rinsed out each loop with around a gallon of distilled water to get the blitz out. On the third flush, I left it running for about an hour, then drained the system and added the coolant. She's ready for prime time now! I'm going to do some testing on it, then take some more detailed pictures of the build after doing some cable management.
 

Attachments

Discussion starter · #13 ·
Is there a deliberate Greek theme on this build? The name Yuki confuses me: this is a Japanese name (I dated a girl called Yuki a while back)... Greek, Japanese? ***? Confused.
No, there is no greek theme. :) The word "Yuki" is indeed Japanese, and it means "Snow." I chose the name due to the white case and the particle effect in the coolant.
 
Discussion starter · #14 ·
Looks great! That coolant is really awesome, I hope it lasts a long time looking like that. Be sure to report back over time how it holds up.
Thanks! I have been in contact with the creator of the coolant and he gave me tips on its maintenance. It is very similar to Aurora in that it uses suspended mica particles, unlike Vue which uses a mixture of surfectants to achieve its effect. He also sent me a bottle of "booster" to restore the effect, as the mica will eventually fall out, the same as Aurora.

It will likely require a bit of maintenance since I don't want that stuff gunking up my loop over time, so I plan to run another blitz through the system at 6 month intervals to clear out the particulates.
 
Discussion starter · #15 ·
Update on the coolant.

After only 3 days, the mica particles already fell out so I'll probably just flush it and put blue pastel back in. The color of the coolant is still really attractive, but why use this coolant if the shampoo effect isn't there?

Thermals have also been kind of wonky -- not terrible, but not as good as when I was using Mayhems Pastel in my old loop with the same size rad and only push. They seem to be about 5 degrees worse at idle and up to 10 degrees worse under load in the CPU loop, but I may wait a bit longer and do more testing since those temps were observed after filling and bleeding the loop with a spare power supply and only the pumps running, which dumped a bunch of heat into the coolant before I got it back together and the fans powered up.
 
I think they were overwhelmed with orders. I?ve had a few corrections myself, but so far CaseLabs customer sevice always comes threw. The SMA8-A case is bigger than my old Merlin by a fair margin. On the HD casters it?s easily desk height level. By the time I add a pedestal the case will be a room accent for sure.
 
Discussion starter · #17 · (Edited)
I think they were overwhelmed with orders. I?ve had a few corrections myself, but so far CaseLabs customer sevice always comes threw. The SMA8-A case is bigger than my old Merlin by a fair margin. On the HD casters it?s easily desk height level. By the time I add a pedestal the case will be a room accent for sure.
I won't lie, the case is massive. It is about as tall as the Thermaltake Tower 900 I replaced was. That case was truly awful to work in, which is why I went CaseLabs.

Customer support answered a few days later and put in an order for the parts that were missing. I should have them in a few weeks. Now that I have the case, I'm in no hurry. I'm ultimately very happy with it. :)

Final notes on the coolant: Flushed and replaced it today with good old Mayhem's pastel blue. I instantly got 5 degrees better thermals at idle, and 10 under load. The Cryo Chillz was great for wow factor, but once the mica fell out, the old tried and true was just better all around. My advice: stick with what you know works well.

25c idle and 35 while gaming as opposed to 30 idle and around 45-50 while gaming.
 

Attachments

I won't lie, the case is massive. It is about as tall as the Thermaltake Tower 900 I replaced was. That case was truly awful to work in, which is why I went CaseLabs.

Customer support answered a few days later and put in an order for the parts that were missing. I should have them in a few weeks. Now that I have the case, I'm in no hurry. I'm ultimately very happy with it. :)

Final notes on the coolant: Flushed and replaced it today with good old Mayhem's pastel blue. I instantly got 5 degrees better thermals at idle, and 10 under load. The Cryo Chillz was great for wow factor, but once the mica fell out, the old tried and true was just better all around. My advice: stick with what you know works well.

25c idle and 35 while gaming as opposed to 30 idle and around 45-50 while gaming.
That is an amazing difference in temps with just a coolant change!
 
Looks great! Seems like you got the build done quite quickly. Out of curiosity, how did you organise the custom white paint for the SMA8-A?
 
Discussion starter · #20 ·
Looks great! Seems like you got the build done quite quickly. Out of curiosity, how did you organise the custom white paint for the SMA8-A?
If you ordered before January, white was one of the color options. I ordered the day they went on sale, so I managed to get one. :) It took about a week of non stop work.
 
1 - 20 of 21 Posts