Overclock.net banner

Asus Zephyrus G14 - Shunt Modded RTX2060 Max-Q | Cooling Mods | Repaste

1 reading
37K views 44 replies 14 participants last post by  Cakewalk_S  
#1 · (Edited)
Hey all,

I'm in need of a new laptop and my Dell XPS 15 9560 is showing its age with its 4 core i5 and GTX1050... I have it hooked up to a 28" 4k monitor and any type of gaming is pretty much strictly limited to 1080p and still it's super slow. I've been looking for a good replacement and I'm stoked that AMD has finally done it.... I'm looking at the top of the line Asus G14. Comes with the new Ryzen 9 4900HS and GTX2060. Now I've been looking at reviews of the laptop and it would appear that cooling might be a problem... I'm planning on opening up the bottom of the case and hacking the vents so that the fans get unrestricted airflow... yea this will void my warranty and likely reduce its resale but based on the specs...this laptop is going to be around for quite some time...

I can't foresee the CPU aging as much as the GPU... Hopefully with decent cooling I can overclock the GPU to eek out another ~10% additional performance or so... based on some reviews and reddit threads, I should be able to get 10-15% increase in GPU performance...

Anyone else have the G14? I'm also super excited to have a laptop that's smaller than my XPS 15... the XPS15 is already pretty compact but man this G14 really looks like a winner.


Based on some initial benchmarks I've been able to find, the GPU will be about 3x faster than my GTX1050. The CPU will also be about 3-3.5x faster than the i5-7300HQ in gaming scenarios....


The MODS


Hats off to some members over at the Notebookcheck G14 Owners club. Amazing work identifying the Shunt needed to boost the TDP of the GPU!
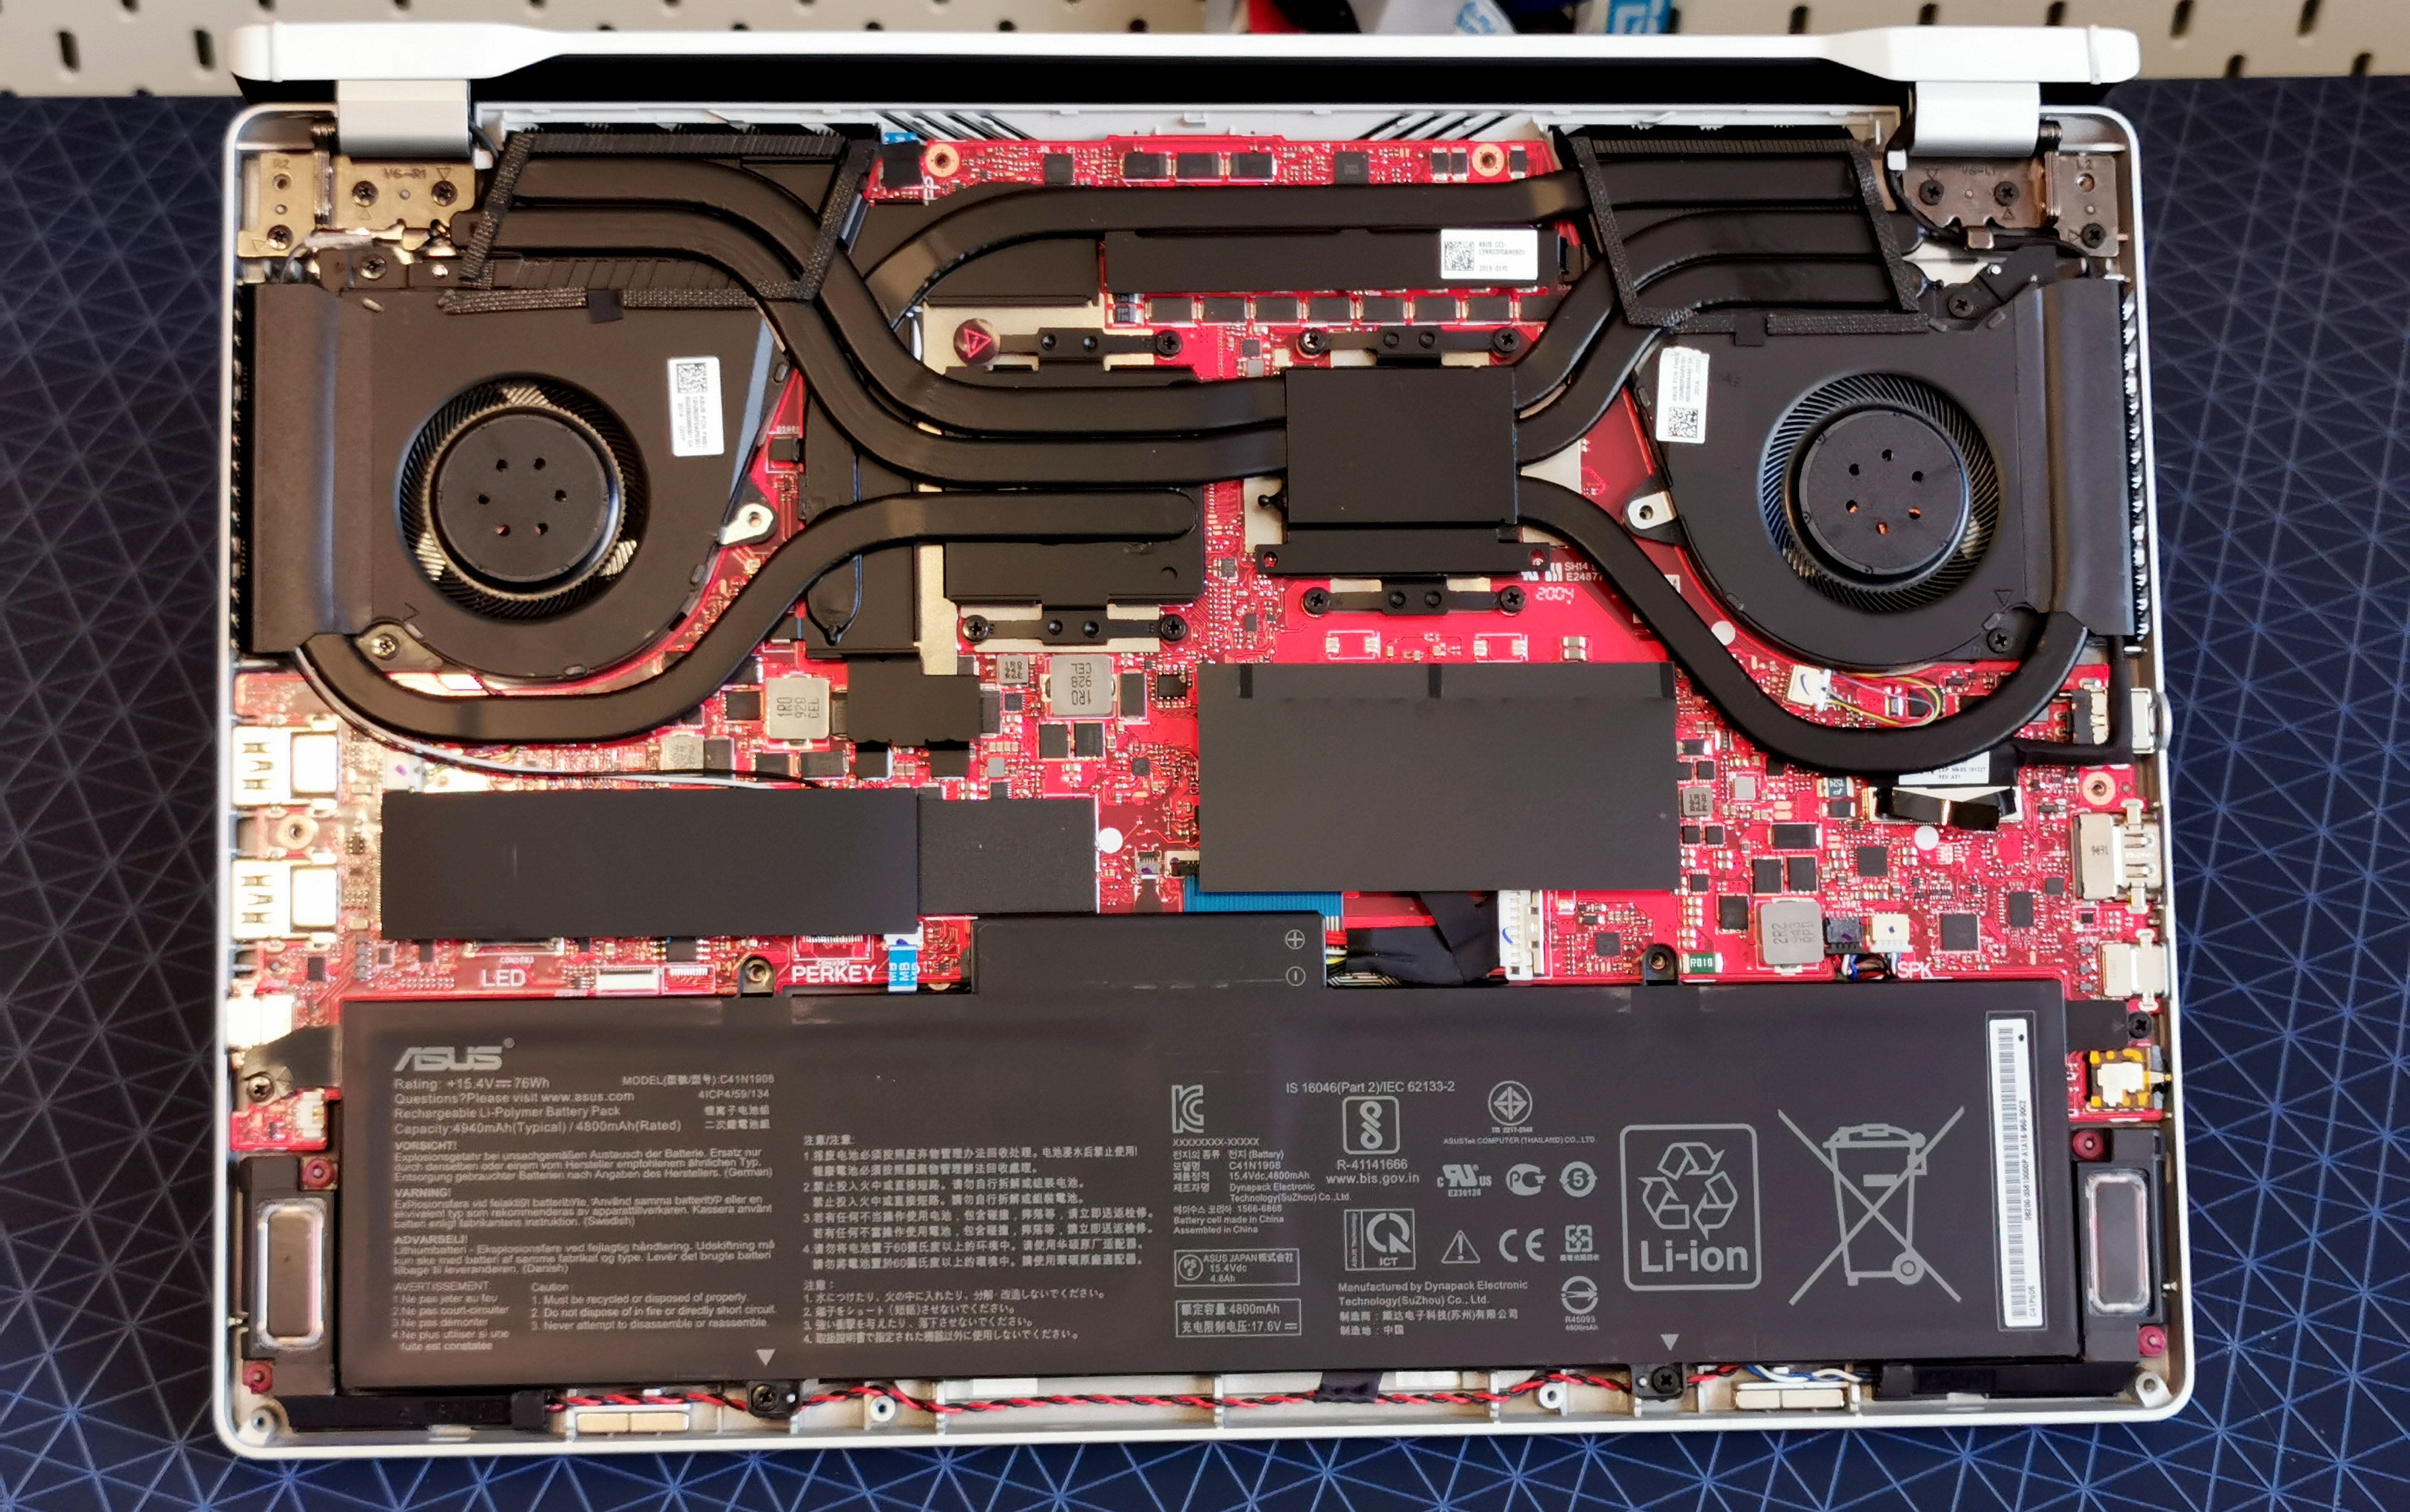
The stock cooling solution is adequate if you intend to keep the laptop at stock clocks...however, that's not me. I like to push the absolute max performance of the unit:
Image

Teardown of the unit revealed that there is a knick in the surface of the GPU heatplate. This actually dented the GPU but its working fine, I ended up lapping most of the GPU heatsink. Surprisingly, I did not have the same contact issue that other people were having with the GPU...the surface on other units is very convex. Looks like Asus figured out their tooling methods to make a flatter heatsink!
Image

As you can see in the top middle part of the GPU heatsink you'll see a little dent in the copper:
Image

I was very easily able to use 2000 grit sand paper and buff that out while removing most of the milling grooves:
Image

As you can see now merely a mirror finish:
Image

Next up was a repaste with thermal grizzly kryonaut:
Image

Image

This is temporary as I will be switching to MX-4 mostly in the coming weeks to see which performs better.
I also added thermal pads everywhere I could connecting most of the heatsink surfaces to the bottom of the case. I don't care how hot the bottom gets since I'll be using a cooling pad and I'll almost never have it on my lap gaming:
Image

Lastly was the shunt mod. This scared the crap out of me since soldering such a small shunt was soo difficult! I used a 0.015mOhm resistor from digikey:
Image

The GPU shunt is next to the M.2 SSD. I ended up using wire instead of soldering the shunt directly to the board..this was WAY easier for me. The modded shunt is protected in multiple layers of high temp electrical tape. With this, my calculations come out to be a ~87W RTX2060. With overclocking that puts it at or slightly above the performance of a stock RTX2060 mobile chip (non max-Q).

One thing to note the screws on the bottom of the laptop are crappy steel philips head screws that strip incredibly easy. They're M2.5 x 10mm for 10 of them and the other 4 are smaller ones at the front of the case but are stainless steel which do not strip on the philips part... I have an order in for Hex head Stainless Steel screws to replace the philips. If you open your laptop often, you'll want new screws. Mine are nearly destroyed with opening the laptop 4 times...
 
#2 ·
I'm really hoping bestbuy has a good laborday sale...

Can't wait to get my hands on this laptop...I'm hoping to lapp the CPU/GPU heatsink and add some thermal pads to the heatsinks... they're so pretty... oh and dremel out the vents so the fans have adequate breathing room.
The internals are quite amazing..especially compared to the XPS 15... Looks like they really did some engineering and thought of everything.
Image


Image
 
#3 ·
Good luck with your efforts in trying to cool down that chassis. I've seen similar efforts done to the A15 and G15, but not the G14 yet. You should get some before and after measurements and benchmarks to compare the difference. There should be some decent gains to be found, especially on the CPU side because that chassis is definitely causing thermal throttling to the 4900H and not letting it perform its best. If you don't have one already, I would also plan on getting a cooling pad to help move a bit more air.

I was pretty high on the G14 when it was first announced, but since then, a couple of other Renoir gaming laptops hit the market that were a better fit for my needs. I ended up pre-ordering the Eluktronics RP-15 in June and have been slowly setting it up since I got it over a week ago.

The G14 is nonetheless a very impressive package for a 14" laptop and still in a class of its own and far ahead of anything else Asus is offering with Ryzen 4000.
 
#4 ·
Hi!

I've been an owner of this awesome little machine for like 2 weeks now, and I only have positive things to say about it. It still baffles me how Asus managed to cram all this performance in this little package, but the thing is impeccable. AMD did an amazing job with these mobile CPUs. The fact that I have 8 cores humming along on a small laptop that can last me the whole day is almost unbelievable to me. I've been so used to the notion that, if you want portability and battery life, then you can forget about performance. Sure, there's been quite a few "thin and light" notebooks with beefy specs on the Intel side, but none have both the performance and the battery life/portability of this thing. It's impressive, truly.

And the weirdest thing is that thermals and noise aren't terrible either. Sure, the CPU will hit 90C under load, but it will sustain its boost frequencies for quite a while. The GPU, while sub optimal in terms of performance (I mean, it's more than fine for a laptop whose main use is not gaming, but I've gotten used to my overclocked 5700XT and the 2060 Max-Q isn't anywhere near that), still gets the job done beautifully. I've even undervolted the core quite a bit and overclocked the memory by some 750MHz and the performance gains are quite noticeable. The fact that this teeny weeny little thing now packs more punch under the hood than my fridge-sized old desktop is astounding.
 
#5 ·
I've seen a bunch of people suggesting to disable boost on the CPU but I just can't imagine reducing the performance of the best of the CPU.... I might try it once i get it. I've heard people getting around 65W for a short period of time on the CPU when its in boost mode....
I'm hoping to pick up the G14 for Black Friday. It's $250 off and I've sold some items to cover the cost of the laptop. I have all new thermal pads and copper strips to do some cooling mods with the laptop... My ultimate plan is to cut the back of the area where the fans are to open up the grills so the fans pull in more air but I'll do that quite some time after I ensure the laptop is running very well and I won't need to RMA for any reason.

Can't wait to overclock the GPU too! Hoping I can get around 6500-7k in Time Spy...

I'm also hoping to lapp the CPU/GPU coolers for better contact. From what I've seen the GPU cooler is quite convex so the center of the cooler makes good contact with the GPU but the edges are where there's quite a gap. I think there's quite a bit of headroom for a flatter surface and better cooling performance! Can't wait to get this laptop and overclock the crap outta the thing.
 
#7 ·
I guess some people over on the notebookcheck owners club have shunt modded the GPU to get like 85-90-105w power limit... Not sure how they're keeping it cool but they're able to get some crazy numbers out of the GPU which gives me hope that the voltage is high enough and unlocked enough to overclock it quite a bit.
2465299


I'll be picking this up on Black Friday when its $250 off. Best Buy is already running the sale ad so I'm excited to pick it up. Hopefully it won't go out of stock, I'll have to place the purchase first thing in the AM....

Step 1: of my cooling mods will be to check the temps under gaming loads on all the chips. Apparently there isn't any HWINFO on the VRM so I'll have to manually check with an infrared thermometer with the back cover taken off while its on an external monitor. Once I identify the hot spots I've got 3 different types of thermal pads all ready to pad up each chip to make contact with the back cover and hopefully help dissipate any chips running hot. I'm not sure what the metal pieces are around the GPU and CPU but I plan on taking them off...they look like they could potentially fall off and cause a short if they hit another chip so its best I remove them...and the black insulation around the chips...those aren't needed...at all.
Step 2: I've seen mixed results with repasting the CPU/GPU so I'll likely take off the heatsink and inspect the flatness of the heatsinks and see if there's any way to lapp them. I have a pretty good guess that the CPU surface will be raised enough from the rest of the heatsink that I should be able to make good contact with some sand paper and lapp the surface... I'm more worried about the GPU heatplate. From all the pictures I've seen its quite convex so I'm hoping that I can get a flat surface on the GPU plate and lapp it back to a flat surface...contact between the dye's and heatsinks will probably produce the best change in operating temps...if I can properly lap them then I'd imagine I should be able to keep boost on and overclock the heck out of the GPU...
Step 3: I also have a bunch of copper tape...pure copper that should enable me to wrap the copper heatpipes together and help create a more even spread of the heat across the heatpipes...I'm hoping this will grant me around a 1C decrease.
 
#9 ·
I have the ROG Zephyrus M15, which is the Intel i7 + RTX 2070 version of this laptop. And yeah heat is a huge issue but it does come with liquid metal from the factory which is nice. Also considering how slim and light it is, the performance level is pretty high. Just a heads up that the Max-Q video cards in these are much slower than the non Max-Q or desktop versions. My RTX 2070 model has benchmark scores similar to the RTX 2060 desktop which is a bit disappointing considering the high cost.

Also, I picked up the i7 RTX 2070 model for just over $1100 new at best buy so there are definitely deals to be had if you are patient.

There have been a ton of reviews done on your specific AMD model and they typically say to leave the fan + clock speed setting on "Performance" rather than "Turbo" as the turbo setting gets pretty loud and performance mode already allows full TDP to the cpu and gpu both.

Also, disable Nvidia dynamic clock in the nvidia control panel. This allows the full wattage to the GPU at all times rather than it adjusting dynamically to load. More consistent high FPS in game.
 
#10 ·
I have the ROG Zephyrus M15, which is the Intel i7 + RTX 2070 version of this laptop. And yeah heat is a huge issue but it does come with liquid metal from the factory which is nice. Also considering how slim and light it is, the performance level is pretty high. Just a heads up that the Max-Q video cards in these are much slower than the non Max-Q or desktop versions. My RTX 2070 model has benchmark scores similar to the RTX 2060 desktop which is a bit disappointing considering the high cost.

Also, I picked up the i7 RTX 2070 model for just over $1100 new at best buy so there are definitely deals to be had if you are patient.

There have been a ton of reviews done on your specific AMD model and they typically say to leave the fan + clock speed setting on "Performance" rather than "Turbo" as the turbo setting gets pretty loud and performance mode already allows full TDP to the cpu and gpu both.

Also, disable Nvidia dynamic clock in the nvidia control panel. This allows the full wattage to the GPU at all times rather than it adjusting dynamically to load. More consistent high FPS in game.
I'm really hoping to not have to reduce boost on the CPU.. alot of people on reddit have said they need to disable boost to make the gaming experience consistent.... I'm thinking there's some additional VRM cooling that'll help prevent any throttling and with properly modding the cooler...I'm hoping a repaste job and opening up the vents will really increase the cooling capacity! Stay tuned. I believe the Best Buy sales start Sunday so hopefully I'll have the laptop early next week!
 
#11 ·
Few updates:
Laptop went on sale 11/19. Ordered it, ended up getting delayed...was supposed to be overnight shipping...best buy got delayed and I ended up having to spend 5 hours on the phone with Best Buy and Fedex attempting to hold the package... FINALLY got FedEx to hold the package by throwing money at the problem... so now it's out for delivery when I'm back from vacation on Monday next week... ALSO, Best Buy just flat out ended up "reshipping" a new laptop free of charge...literally a 2nd laptop at no cost... that's also scheduled for delivery on Monday... So now at this point I'm scheduled to get 2 laptops for the price of 1. My Order page literally has a 2nd laptop at $0 cost... it's weird... I'm not sure if Best Buy is going to request I send one back once I get both? The great news is I'll have 2 laptop's on Monday to determine which one has less defects/overclocks better...

Also over on the notebookcheck forum are people that have already shunt modded the GPU... They've increased the TDP limit on the GPU. I've decided I'm likely going to disable boost on the CPU and that'll give me the temps I want along with extensive cooling mods/repaste/lapping etc... Stock the RTX2060 Max-Q should be just shy of ~6k on Time Spy... People with shunt mods have boosted over ~7k so I'm hoping for around 7k also. My TDP limit should be going from 65w to 88w with the mod... which should be around a full 2060/2070 Max-Q performance... Stay tuned!
 
#12 ·
So I finally received 1 of the two laptops...the 2nd one they're holding and will send back...

Got everything set up...ran some benchmarks and I'm hitting around 1930 in CinebenchR15 multicore which is insane performance! The WD 1TB SSD ain't shabby either with like a 3600 score in AS SSD.


I've already started to mod the laptop, you can follow my album here:

One thing I will mention, GPU memory overclocks quite well but is still a lower voltage bin than desktop variants...so sadly you won't see desktop memory speeds... Right now I can get +1100 stable in MSI Afterburner on the memory which brings the memory from 1375MHz to 1625MHz in GPUz. Nice improvement but unfortunately I hit the 65w TDP limit immediately and I really only sustain ~1500MHz on the core. I have a new shunt and I'll be shunt modding my laptop for around 90W on the GPU. Thankfully the cooling performance is incredible as after a repaste, I'm able to max out at 62C on the GPU...with an additional 20W or so I should easily have plenty of cooling. I'm hoping to get another 200MHz or so on the GPU and settle in around 1700MHz.
 
#13 · (Edited)
Little update:

I was able to successfully shunt mod my laptop! I used a 0.015mOhm shunt added to the GPU shunt. All the credit for finding this goes to a few members over at the notebookcheck forum. Upon soldering and booting up, I'm able to get a decent boost in performance!

Valley Benchmark (Extreme HD Preset):
Stock: 74.6fps (3,120)
Shunt Mod Max OC: 88.8fps (3,717)
% change: +19%

3DMark Time Spy (graphics score):

Stock: 5,850
Shunt Mod Max OC: 6,818 https://www.3dmark.com/spy/17145963
% change: +16.5%


3DMark Firestrike (graphics score):

Stock: 15,578
Shunt Mod Max OC: 17,784 https://www.3dmark.com/fs/24579267
% change: +14.1%

Temperatures are amazing! After repasting AND the shunt mod, I'm maxing at 65C on the GPU and around 88C on the CPU during benchmarks...Fan speeds are custom and very low while gaming...couldn't be happier with this beast of a 14" laptop!
 
#14 · (Edited)
Little update:

I was able to successfully shunt mod my laptop! I used a 0.015mOhm shunt added to the GPU shunt. All the credit for finding this goes to a few members over at the notebookcheck forum. Upon soldering and booting up, I'm able to get a decent boost in performance!

Valley Benchmark (Extreme HD Preset):
Stock: 74.6fps (3,120)
Shunt Mod Max OC: 84.7fps (3,545)
% change: +13.5%

3DMark Time Spy (graphics score):

Stock: 5,850
Shunt Mod Max OC: 6,441 https://www.3dmark.com/spy/15887179
% change: +10.1%


3DMark Firestrike (graphics score):

Stock: 15,578
Shunt Mod Max OC: 16,504 https://www.3dmark.com/fs/24214388
% change: +5.9%

Temperatures are amazing! After repasting AND the shunt mod, I'm maxing at 65C on the GPU and around 88C on the CPU during benchmarks...Fan speeds are custom and very low while gaming...couldn't be happier with this beast of a 14" laptop!
Hi there,

I just got this lappy on Friday, last week. Got an open box, paid $970. Thought it was a good deal. Also got 2 other ryzen renoir laptops too, just to test out and see which one to keep. I got the Dell G5s, with the 4800g and 1660ti for $640, 144hz, open box, and the HP Pavilion with the 4600h and the 1650, 60hz for $360, open box.
The Dell is absolutely horrible thermally, easily reaching 110c cpu, its going back. I've never owned a PC of any type, server, desktop, laptop that got that hot before, except when I didn't attach the heatsink correctly one time.

The Pavilion is quiet and cool, cpu never goes above 70c. Also funny is the $360 Pavilion comes with 1 - 8gb ddr4 3200 dimm (2 slots total, 1 available) and the Dell G5s (special edition, lol, right?) comes with 2 - 4gb ddr4 3200 dimms and is like $300 more, lame... Not sure about you, but I'd rather have 1 - 8gb dimm and slap another in for $30, then have to but 2 dimms and throw away the 4gb dimms.

Also, I have word that another G14 is on the horizon with a 16gb dimm soldered onboard, we'll see. I currently own 2 Lenovos, a Y740, 17" i7 8750h, 32gb ram, 2080 maxq flashed to non-maxq, with Gsync 144hz, and a y545 15" 9750h, 16gb, 2060 non maxq 144hz, and an evoo 15" 9750h, 16gb, 1650 - I like this one because they leave the bios unlocked, you can overclock the system ram and stuff, and I have a bunch of other laptops too, don't want to drag this out.

I have to admit though, the Renoir mobile processors ABSOLUTELY OBLITERATE THE INTEL MOBILE PROCESSORS AND MOST OF INTEL'S DESTOP OFFERINGS TOO. Sorry about the cap, I'm super impressed though, except for the Dell G5s, what a waste of an awesome processor.

I haven't cracked open the ASUS or the Pavilion, but I cracked open the Dell, just to see if there was something fudged up inside, there's not, and many many reviews state the PC goes above 100c easily. What a pile of poo poo, I can't live with that temp. Not even going to try repasting, its just a thermally fudged up design, and the engineers who designed it, and let the laptops enter mass productions should be castrated, as to not allow their obviously whack DNA to proliferate with the other inhabitants of this planet. Who's going to let that thing fly, and say, oh well, it's within AMD's thermal spec, it stays under (a frickin) 110 degrees CELCIUS. Come on knuckleheads, use your brains! I don't think any amount of lapping, thermal paste or pads or copper tape, Conductanaut, putting it in the freezer, etc will help this laptop and that's unfortunate, because I always enjoy tearing about a brand new machine, taking a dremel to it, ripping out the dust prevention mesh, to keep them cooler and overclock.. Anyway, I digress.

Here's my time spy scores for the ASUS and the Pavilion without any thermal modifications, just overclocking the GPUs a bit (using the afterburner OC scanner and setting the memory to +400 mhz or so). Neither appeared to be anywhere near artifacting during the runs:

Zephyrus G14 - 4900HS, 2060 Max Q:
6579

Pavilion 4600H, 1650:
3913

Didn't really push either lappy. Decent scores though, I think. I am interesting in shunt modding them both. Didn't even bench the Dell, even though it has good specs, 144hz screen, etc, I don't like any laptop that I can set on top of my raw eggs and bacon and have them cooked in under 15 minutes.

I also like that the G14 has an AMD freesync panel, too cool. I can't seem to get the freesync to run at the panels 144hz rate though, only 48-60hz, oh well, whatever. Also, I'm not a fan of the braille back of the display, I mean, there are no LEDs back there, just give me a flat back to it, it looks weird with all the holes.

Do you happen to have a link to the info on the shunt mod, if its allowed here, and do you have to solder the resistor in, or can you just go without?

Thanks for all the detailed info too, great read.
 
#16 ·
Well little update:

My journey has brought me to ruining the motherboard of my G14... The other day I decided I'd tackle the task of lapping the heatsinks...well unfortunately this was before my coffee and I ended up putting the JST connector for the GPU fan back in just enough where it BENT the pin inside the female connector that's attached to the motherboard... after an hour of struggling with a needle to try and bend it back... I just said F it and ended up pulling up the entire JST connector from the motherboard...pins and all...
Image

Thankfully I was able to solder the fan wires directly to the solder points from the JST connector... So all in all it works... now the functional piece... I'll have to be extremely careful now anytime I take the fans/heatsink off... I can only spin the entire unit because the wires are soldered to the board... I can still take off the heatsink I just won't have as much flexibility to move it wherever I want...the mobo just has to come with it...

After lapping both heatsinks the CPU is slightly cooler and same with the GPU. I haven't uploaded pictures yet but the heatsink after repaste is convex... I didn't really notice any temperature difference after lapping so at this point its a moot point...
 
#17 ·
Quick update:

I realized the shunt I was using and the wire is creating too much resistance to really be a benefit and increase the TDP significantly. I ended up reducing the shunt to a 0.007ohm then realized even that wasn't doing it, so I just wired it directly.
Image


Running some calculations with 28awg aluminum wire, I should be around the 12-15ohm range which would put me around a 95w TDP. Based on the new scores I'm getting in benchmarks, that checks out to be true. I'm still topping out around 69C on the GPU so still plenty of headroom. I think I'm happy as it is right now....might try to push it more in the future, all I have to do is shorten the wire then resolder and I'm done so its really quick.
 
#19 ·
Honestly, not sure.. I literally just went off of what other people did with their laptop...I would have had 0 idea where to start... Maybe check notebookcheck forums to see if someone else has done that before?
 
#20 ·
Just a quick update on this: I'll be swapping out the thermal paste on my G14 for Liquid Metal TIM. I've seen some people over on reddit do it and they've got some amazing results. With all my mod's I've done on my laptop if I get a 5C drop which should be easily doable with Liquid Metal TIM, that would be amazing. Honestly I'm shooting for more like a 5-8C drop. I'm also looking at slightly decreasing the length of the wire on the shunt to increase the GPU power draw even more.... with the max cooling potential... I should be able to crank out a ton of watts through the GPU with no problem.
 
#23 ·
I have the Asus G14 Zephyrus and I am interested in the same mod. I solder every day and I know the possible consequences of this mod. I am about to repaste so I want to try the shunt mod. The issue is the original link posted here is not accessible anymore.
Could someone share this guide?
Thanks you and congrats about your grea success with the mod!
 
#21 ·
Well I did it folks! Liquid Metal Conductonaut is applied to the CPU and GPU.

Before:
Image


Liquid Metal TIM on the heatsink: (I let it soak in the copper for about an hour. Not sure if it'll help prevent the LM from drying out...we shall see)
Image

I used butyl rope to coat the SMDs around the chips... I figured this was a good solution since butyl can take high heat and also its non-electrically conductive..and is easily shapeable
Image

Image


I finally applied some TIM around the butyl to crate a dam or seal between the heatsink and chip substrate. I don't want any LM leaking out from the die's on to the mobo which would destroy it...
Image

Image


Results are in:
I've dropped about 10C on the CPU and about 2C on the GPU...not awesome results on the GPU but I think that's because I applied such a small amount on the GPU that I could have actually done more...time will tell how long I can go without replacing the paste... I give it till new years till I have to crack open the case again and add more LM...
 
#25 · (Edited)
Thanks you so much for your feedback. Looks awesome to try it.
I repasted yesterday with Hydronaut, not getting nice results. It went from 90s to 80s and that's all on stock.
I am thinking about switching to liquid metal making a custom silicone pad for isolate die liquid metal from leaks like the sealing from the PS5. I am afraid with such of nice machine.
I am mad there is nothing for sale todays.
What about the shunt? I do not have SMD resistors available. Is there any consideration shorting B shunt directly with wire?
Just for fun this is what stock thermal paste looks like with 1 year of regular use:


Image


Image


What a bullshit paste for such a good build quality :(
 
#26 ·
I am just posting the G14 2021 liquid metal stock solution from asus. Maybe this gives you some idesas for your laptop. Sorry I cannot credit this becase I didn't remember the post I took it from.

Image


Iwill try to reproduce this setup next time I repaste my unit. It seems like precise cutting foam and thermal stable non conducting sealingis just good. I will use nail polish to protect the processor component arround the die.
 
#27 ·
Love it man! Great work! Good to see someone else taking the dive into liquid metal.

As far as the shunt mod goes, I started with a shunt then ended up removing the shunt entirely and just having a strand of some 26 gauge wire... that resistance was enough to give me the performance boost I was looking for. I've been going back and forth in my head if I want to shorten the wires even more but ATM, newer laptops are already 30-40-50% better performance than this and I might be able to eek out another 5% tops...so honestly I don't think it's worth it. Yes, it'd be nice to win a d*ck swinging competition on 3DMark scores but they'll pale in comparison to the RTX3060 and newer 6800S or whatever the new GPU is now.

I'm at the point where I need to reapply the liquid metal...temperatures have definitely gone up ~3-5C so I'm thinking now would be a good time... I just need to find the downtime to do it since it's a multi-hour painstakingly careful process...
 
#28 ·
Repaste complete and laptop still works! So it's a win!

Yes, the liquid metal unfortunately was about 75% all dried up after about 8 months.... My #1 concern was pulling off one of the soldered on wires for the GPU fan....since I destroyed the JST connector they're the most fragile thing in the world so not pulling one off the motherboard was a huge win! I did last time I took the cooler off and it sucked getting it back on...

Temps I believe are much better. I've reached the saturation limit of the heatsink meaning I don't think I can get any more performance out of it...
I hit a all time new high score for Cinebench R15 and CPU temps didn't even go about 75C!
Image

Image
Image


I'm hoping since the copper heatsink is now an alloy from the first liquid metal application, the 2nd time will stay liquid for much longer. And I applied more paste this time just to be sure. The thermal paste dam worked very well and I had no sign of leakage.
 
#29 ·
Repaste complete and laptop still works! So it's a win!

Yes, the liquid metal unfortunately was about 75% all dried up after about 8 months.... My #1 concern was pulling off one of the soldered on wires for the GPU fan....since I destroyed the JST connector they're the most fragile thing in the world so not pulling one off the motherboard was a huge win! I did last time I took the cooler off and it sucked getting it back on...

Temps I believe are much better. I've reached the saturation limit of the heatsink meaning I don't think I can get any more performance out of it...
I hit a all time new high score for Cinebench R15 and CPU temps didn't even go about 75C!


I'm hoping since the copper heatsink is now an alloy from the first liquid metal application, the 2nd time will stay liquid for much longer. And I applied more paste this time just to be sure. The thermal paste dam worked very well and I had no sign of leakage.
Pics deleted to keep scrolling to a minimum

Is my last post going through? Does it take some time? I got banned for a moment there due to forgetting my password from another device and hopefully my reply isn't gone lol.
 
#30 ·
Hi, im interested in shunting my rtx 2060 mobile 90w to maybe 115w
I have very little experience soldering but I can always practice
I'd like to know, what kind of gains have you gained ingames after your shunt? I noticed some synthetic scores but no game scores
My laptop is a DTR clevo p775tm1-g so GPU is an mxm card
GPU currently tops at 65degrees with high cpu usage (cyberpunk likes to abuse my i7 9700k). GPU core has someheadroom but I'm not sure about the GPU vrms which have no temp detector
 
#36 · (Edited)
Hi đź‘‹ I am interested in this mod, I collected some information about Shunt Modding, my device is Aorus 17 WA comes with Rtx 2060 the cooling system is very good in the device, I also applied liquid metal in the past with caution and for modification purpose I cleaned it , now the problem is that Shunt resistor r005 I can't find it anywhere on the mother board I tried flipping the board and nothing, Could some one help me to identify the shunt? because the only ones I can see are r004 Shunts and they are from the factory like that, it's confusing for me because based on the information that I have, the Shunts from factory card's or other laptops comes labeled on the board r005 maybe I misunderstood I don't know , so yeah I am little afraid about the modification , let's say for example If i want to soldering smd shunt r010 on top of r004 to lower the resistance from 0.4 mhom to around 0.29 mohm the idea seems good but I can't clarify
if it the required shunt to work on it.
The pictures are attached Also.

for who is asking what is my TDP underload in GPUz is around 92 Watt.

Here is my time spy result with oc the card

Any advices, tip's or ideas are welcomed 🙂
With my best regards!

Image


Image

Image
Image


Close up pictures
Image

Image

Image

Image
 
#37 ·
Small update here. ended up getting higher and higher temps, so decided to repaste. Thankfully I just barely had enough LM leftover to do it again...whew!
Here's the LM after 1.5yrs.
Image

Image


Pretty dried up on the CPU but not the GPU..not sure why? Maybe the CPU just runs hotter? I'm not sure here.
Image

Image


I ruined the JST connector for the fans so I ended up finding a way to remove the heatsink without removing the fans...so I didn't have to mess with the wires or anything like that...thankfully! Overall a good 2-4C difference in lower temperatures but not a huge difference.
 
#38 · (Edited)
I know this is an old thread but the laptop is still kicking just fine so I wanted to revive and provide an update.


I've been attempting to flash vbios without any luck and unfortunately there's no way for me to modify existing turing bios with a higher TDP. Shunt mod is the only way this will work.

I've been running the laptop daily for almost 5 years now with no problems. It's been great for me. I've since replaced the liquid metal with PTM 7950, questionably authentic though...

Let's take a trip down memory lane:

I have since removed the shunt mod and this is the completely stock GPU results - I scored 5 878 in Time Spy
Stock Results: 5,528


Now with the shunt mod installed (keep in mind, I did this completely wrong, I just bridged the resistor and basically said f-it to the resistance value)....
Again this is completely stock clocks, no overclocking, just pure additional power - I scored 6 426 in Time Spy
Shunt Results: 6,102 (+10% Increase)

I actually had no idea what I was doing years ago when I created this thread. I was merely following some other people on the now defunct notebookcheck forum. I have since smarted up, and AI....and I'm more aware of what this is doing..

I've measured the resistor B in the image below. I get the following values:
Image


Idle Voltage: 20.05V from measuring either side of the R005 B resistor and the solder pad just to the right of it.
Under GPU load: 19.81V
Measuring the Vdrop between the shunt: 16.4mV on Resistor B | 11.3mV on Resistor A

Supposedly resistor B controls just the vCore TDP, and resistor A has nothing to do with the core TDP, apparently it's just for Vmemory

Now I didn't measure the resistance or voltage drop when I had the wire bridge between the resistor... I'm guessing the vDrop was so low due to low resistance that there was some sort of throttling happening and I wasn't able to get proper TDP out of the GPU. I've since ordered a few resistors and will attempt the mod again..correctly this time.


I'm planning on adding a 7mOhm resistor on top of the R005 resistor to get this end value of 112W TDP:
VoltagevDrop=ShuntWattagemOhmsAdded Shunt
20​
0.0164​
0.328​
0.005​
66​
5.0000​
20​
0.0164​
0.328​
0.002917​
112
2.9167​
7​
mOhms

I've also ordered a 10mOhm and 15mOhm resistor in-case that value is too high and there's some additional throttling going on.

Over the original 2060 Max-Q I've been able to boost performance by almost 19%, going from a Time Spy score of 5,528 to 6,692. However, I still think there's plenty of headroom since the original posts on notebookcheck had people well into the mid 7000's on time spy. I'm hoping that by doing a proper resistor mod I'll obtain higher TDP values. I'll use a watt meter to measure the differences to determine my end results. I'm about 2 weeks out from getting the new resistors so I'll update the post once the resistors are in and soldering is complete.

Thermal headroom isn't an issue on the GPU or CPU cores. Even with the crappy PTM 7950, I've maxxed out the GPU temperature at 55C running Valley benchmark without a shunt mod. Pretty low temperatures IMO.
I've also switched to G-helper which is amazing compared to armory crate...gosh what was I thinking....


I've created the following table based on resistor values that should represent the TDP increase in the core:
Shunt AddedmOhms TotalTDP% Power Increase
STOCK 5.00
65​
15mOhm 3.75
87​
34%​
10mOhm 3.33
98​
51%​
7mOhm 2.92
112​
72%​

I'm not sure how much the power brick can take, however, like I said, I had a wire bridged between the resistor...freaking crazy. I had that for YEARS! Now I'm guessing the TDP was significantly lower as there's probably some artificial limiter here but I'm really curious now to make additional attempts soldering an actual resistor properly.

I've revived the thread as I'm likely going to be purchasing a new G14 this fall if all goes well. I'll also be getting the 5070ti 12GB version of the G14 which will be about 2.5-3x faster GPU than this 2060. I haven't decided if I want to do a shunt mod on the new G14, but I'll definitely be doing cooling mods/liquid metal on the new laptop. My goal is absolute top performance of that 5070ti. I plan on getting BF6 so looking forward to some good times again!

Thanks all! Feel free to ask any questions!

Edit: just found this thread and this is what I'm looking for: https://www.reddit.com/r/ZephyrusG14/s/fcZ5x69hpz
So that confirms that I might need to mod both shunts, I'll likely attempt the higher resistance resistor on the A resistor to test it out first. I'll see if one resistor makes a difference but based on the reddit thread, it's likely going to make a big difference.