Overclock.net banner

[Build Log] Tree Diagram - Mountain Mods / Threadripper

1 reading
6.6K views 44 replies 12 participants last post by  TATH  
#1 ·
I've been a lurker in these forums for quite some years; never had the chance to fully document any of the builds I've done while enjoying this hobby, I am giving an opportunity to myself to document this build this time for good!

I am a sucker for old-school cases; my last build was on a TJ07 (a picture attached), this time I've decided to go for a Mountain Mods case, I've wanted an MM case since I was in highschool (around 2009!), a couple of years after I could actually afford one! Their design is definitely on the outdated side, missing key features like cable management and such but that will be the fun behind this build, I hope to bring a bit of modernity to this old case.

Image


Now I "upgraded" to a different type of hardware, a WRX80 motherboard with a 5975WX which I mainly use for somewhat heavy virtualization of network devices, so the intent of this machine is mainly to be a workstation for both actual work and some occasional gaming.

What to expect from this build:

MountainMods Ascension Extended case
A couple of DIY distribution plates
Metal tubing
A bit of modding
Custom sleeving
Bad quality photos!

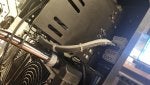
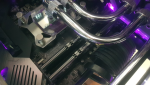
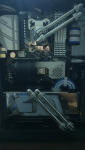
And to start the log; some bad photos of the ascension case; I promise to get better photos of it after I make progress on it.

Image
Image
 
#3 ·
As I plan on taking my very sweet time making this build; I have decided on making it as modular as possible when it comes to watercooling and cable management.

For cable management; I definitely like my cables to be as tidy as possible, I have sleeved PSUs with custom lengths in pretty much all my builds.

Image

Image


I am a fan of using cable combs but also a fan of passing these cables through a "wall" acting as a comb, which is I find aesthetically pleasing but on the other hand, it is a pain to adjust when swaping motherboards as the 24 pin header will almost never match the machined holes through the wall-as-a-comb.

Fortunately (or not) the SR-2 motherboard on the Ascension gives plenty of width o hijack a 24-ping wall-as-comb, so I decided to machine an acrylic piece to add this comb piece as modular as I could; it also adds a bit of rigidity to the whole tray.

Image


And now its time to machine it; I am using my hobby 6040 CNC for all my acrylic pieces:

Image

Image

Image


And voila, it fits!

Image


Image


Image


The big hole/rectangle on the piece will allow me to only machine a simple, rectangular piece with holes for the 24 piece and some 3/4-pin connectors in the future If I need to re-arrange them to different heights.
 

Attachments

#4 ·
Additional to that piece, I've decided on the first distribution plate that will be on the left side of the motherboard; I am aiming for a reverse ATX build and the two-line distribution plate (with no pump) will help me to adjust the height of the tubes in case I want to go for a straight tubing design for this case.

This is the bottom piece for the plate, the top piece will have more G1/4 threads than just 4 in the back, hopefully this can give me more freedom to route the copper pipe in different curvatures...

Image


And well. it is time to machine it, this is a 10mm acrylic piece.

Image

Image


Image
Image
Image


And that is for all my updates so far; I will be ordering some HWLabs radiator for this guy, as the MORA/Nova1080 option is not compatible with the Ascension Trinity front Panel (and to be honest, I like how the Fan distribution looks like on the default option, it is more symmetric...
 
#6 ·
I always wanted a Mountain Mods or Caselabs. Then I started doing custom loops and realized a "normal" size tower using external cooling with quick disconnects was a lot easier to maintain than a monster tower full of rads.

Excited to see a modern build in a dated case. Your TJ07 build is beautiful.

Also looks like you have a pretty nice mechanical keyboard collection.
 
#7 ·
Thank you both!

Beautiful.

Sucks to hear the MORA/Nova1080 wouldn't work -- that was the first thought I had when I seen the front of that case!
I ordered a custom panel from MM but realized that I liked the way holes are distributed in the default configuration hah, I guess I'll have a use for it in a future build; for now I am waiting for 3xGTX 360 rads from HW labs for it.

I always wanted a Mountain Mods or Caselabs. Then I started doing custom loops and realized a "normal" size tower using external cooling with quick disconnects was a lot easier to maintain than a monster tower full of rads.

Excited to see a modern build in a dated case. Your TJ07 build is beautiful.

Also looks like you have a pretty nice mechanical keyboard collection.
Thank you! collecting these became a hobby in the past 2 years haha
Image


I am thinking on this color way for the cables, not sure if the blue accent will be final but likely yes

Image
 
#8 ·
So I’m going to be doing a build in the same exact case. I’m going to run a 2x140 in the front and replace the front 5.25 panels with mesh. I will also be running a 4x120 BlackIce 480GTX in the bottom.

I have plenty of pumps and reservoirs to choose from but technically I don’t need a reservoir because the highest point in the loop will be the top of the 2x140 radiator and it has an oversized top with 6 ports for bleeding filling and the loop itself.

I’m going to either user a AuquaComputer pump/fan controller if I use the integrated pump/res/cpu block or I’m going to use a AquaComputer USB controller D5 that can also control a channel of fans if I use the DT block.

If I can find someone to help me print a new Spyder for the DT 5 Noz block that would be awesome. I have (2) blocks and (2) sets of black and (1) set of white Spyders and tops.

One of my DT 5 Noz blocks is the exact block in the Martin’s liquid lab photo. I bought the block and both tops/spyders directly from him.

Image
Image

Image


Image

Image

Image

Image

Image
 
#10 ·
After some days, I am back with an update. I just received the front radiators and its fans. I picked up some GTX 360 (non L) variants and I am glad that these fit (very thightly!!) into the trinity default panel.


Some shots on the rads
Image

Image

Image

Image


9xLian Li P28 fans
It is my first time using attacheable fans and this feature is pretty useful for rads!

Image

Image

Image
 

Attachments

#11 ·
The trinity panel has literally just holes for the fans, for the fan grills I will be using.....

These el chapo fan grills!
Image


I was thinking on something fancier like mnpctech but at the end, these grills suit the case almost as if these were meant to be used on this case.

The P28 fans are around 28mm thick, when used with fan grills and the 2mm aluminium panel, the 30mm screws included with the radiator were not enough. I had to bought 35mm screws to get them through; carefully sitting with nonclearance just touching the rad fins! Be careful on not puncturing your rads.

Image

Image

Image


Final front panel assembly with a leak test. See how there is no clearance between radiators!

Image

Image


And some final pics of the front panel attached to the case.
Image

Image

Image

Image

Image
 

Attachments

#14 ·
Now that the front radiator and top radiator are in place; I can plan for the first (full) distro plate, which is the back distro.

Will be using this old-af, outdated and badly reviewed reservoir, not because it is good or anything, just because I simply always wanted one.

Image


With two dual DDCs, these are the 4.2 new variants

Image


The position of the power supply on the case is at the top, now blocked by the top 360mm radiator, so I will be designing my own PSU holding place combined with a waterblock.

Image


Image


So let's start machining, starting with the o-ring channel which is the most challenging part as the depth of the channel cannot exceed 1.3-1.4mm
Image
Image


Final cut:

Image


(almost final product)

Image


A closer look to the engravings

Image
Image


Making the o-rings and manual tap.

Image


Positioned on the back of the case, with one of these new drain valves!

Image


Engravings look better without the protective film!

Image
Image
 

Attachments

#15 ·
Unfortunately, I could not record the machining of the top piece, but it is very simple compared to the bottom one. Here is the final assembly with some tubes on it:

Image


Leak test passed!

Image


Image


From this picture you can observer the top of the back of the case, which has two holes for fans and PSUs I will no longer use; I will replace these with another distribution plate to cover it, I will be machining it today!

Image


Btw these copper pipes are 1/2 OD type L copper from my local store/supplier in Mexico. I bend these myself with a torch and a tube bender, the final pieces will be nickel plated/chromed too

Image


The fittings I am using are old alphacool HT 13mm fittings, which are compatible with these copper pipes; I will be using these alphacool HT for the back and eiszapfen pro ones for the front side
 
#17 ·
Subbed! Loving this build so far (y)

I wish I had the skill set and tooling to make distro plates. Those things are just awesome!
I must say that my first 4 attempts to make my very first distro plate ended up in the trash all times! This is the culprit

Image

Image


I'd say machining errors are more common than design errors haha (o-ring channel depth due to uneven surfaces in poly/acrylic being the most critical part that can lead to leakages, specially on larger blocks).


Now I am back with new updates for anyone watching this thread!

Before that, a new keyboard I bought, theme is Serial Experiments Lain !

Image


Remember this one:
Image


I have machined it alerady, here are some shots:

Image


Image


And some gettho leak testing:

Image


I used to have a leak tester with a hand pump and barometer, but these sometimes throw some false negatives when it comes to testing non-commercial blocks; tolerances for air-tight are way smaller than water-tight; once or twice the hand pump ended up inflating my blocks while pursuing 100% seal conditions.... not saying these are bad, these are actually pretty useful, but for my purpose these are a bit too overkill.

Block in place!

Image

Image
 
#18 ·
Now that the two side waterblocks are in place, I can take some of the hardware components to measure the top distro and the holes for the right-side distro.

First, my favourite component of the build: ASRock WRX80 Creator (rev 1.0) I bought last year from may Japan trip at a hardware store called Tsukumo with a very competitive price tag!.

Image


For the waterblock: Optimus for Threadripper:

Image


I forgot to take a picture of the 5975WX and honestly I do not want to take the block apart as it took me a few tries to get the pressure right with the Threadripper torque tool!

Image


Motherboard in the removable motherboard tray (that will not be that removable after all the assembly...)

Image


Now, the memory: 386GB of ECC RDIMMs (currently just 6 dimms as I am pending to buy the remaining 128GB, 386GB for now haha..)

The blocks: Bitspower 4-DIMMS RAM Water Cooling Module Double Pack - Digital RGB

Image


Image


Using bitspower 12mm push fittings and 90 degeres couplers from Corsair; using the bended tube would not be possible as the radius of these bends is too large to maintain the tube diameter.

Image

Image


For internal m2 storage:

Image


Then my main GPU: As much as I wanted to put a 4090 on this build, I mainly use Linux/Tumbleweed as my OS and NVIDIA (even with the latest drivers) in Linux is simply not that stable; a 7900XTX will be (Merc 310 from XFX)

Image


With a waterblock from Alphacool: Core for XFX Merc 310

Image


Image
Image

Image


And for the second GPU; for my VFIO/GPU Passthrough to my WIndows 11 VM (Fusion360, Solidworks and some games not available via Proton), I wanted a good tradeoff between gaming performance but more importantly, CUDA core density that can be used with no dedicated power cables, and these RTX A2000 were a pretty good deal!

It has a bykski waterblock as it is like the only brand making blocks for this card, they used to have an acrylic variant but not anymore, the full metal version is cool though:

Image
Image


And with all of these in place, I can measure on how to design the rest of waterblocks
 
#19 ·
I did not record any of the machining of the top distribution plate but here are the finished pieces; both left and top distros:

Image


Each block is manually tapped too, with the good old trick of using a pass through fitting for a straight vertical tap.

Image


And assembled to to the pipe measurement
Image


All pipes are now bended (torch+bender) and ready for chrome plating !
Image


And plated!

Image


Before using these, I had to make a piece to join both left and top distro:

Image


And here is the assembly, it provides additional strength to the wobbly motherboard tray.

Image


Image
 
#20 · (Edited)
And with the assembly done; the removable cable combs:

For the top distro:
Image

Image

Image

Image


For the backbone piece:

Image

Image


A new keyboard I got (DNDD by DNworks)

Image


Now, the rear tubes!

Image

Image

Image


And the front radiator tubes:

Image

Image

Image


I have changed my mind on the drain port tube, so I decided to make a new piece to join IN and OUT ports of the left plate, I will use valves to restrict the traffic of each port.

Image

Image

Image


And this is it for now!

Currently waiting for some more fittings to arrive and a pressure valve. I will be working on sleeving next week!

Thanks again for checking this out
 
#21 ·
I am back with some updates!

With the tubes plates now I can start cutting them to fit the loop, here are some photos of how the connections will look like in the end:

Image

Image
Image

Image


For the storage, I will be using the following:

1x4TB Predator NVMe (main OS/Linux)
3x2TB PM961 NVMe (1 - RTFS/Timeshift Backup for everything but /home and /root, 2 - Windows which I rarely use, 3 - /Virtual Machines [Windows, Cisco Virtual Machines for Network Modelings, etc]
4x2TB PM863 for RAID for more backusp (RTFS/Timeshift, /home backup, /vms backup)

Image


Image

Image
Image


And on the next post: Cable Sleeving!
 
#22 ·
Sleeving is not the thing I enjoy the most, but the thing I put my best effort for it to look nice, here are some photos of the process.

Tools I used:

From Mainframe Customs:

Teleios - Gunmetal Gray 25ft​
3​
$20.25​
Teleios - Silver 25ft​
3​
$20.25​
Teleios 2mm - Gunmetal Gray 1ft​
10​
$2.50​
MC Custom 16AWG Wire - Black 25ft​
6​
$41.94​
OverkillPC's Knuckle Combs - Silver - 24pin
  • Style:
    24pin
4​
$15.00​
Female ATX Terminal (18AWG/16AWG) - (100 Count)​

Terminals (from ModMyMods)

MMM 4-Pin Molex Female Connector - Black (MOD-0114)
MOD-0114​
6​
MMM 5-Pin SATA "Push In' Female Connector - Black (MOD-0248)
MOD-0248​
4​
MMM 5-Pin SATA "Push In" End Cover- Black (MOD-0249)
MOD-0249​
4​
MMM 5-Pin SATA "Push In" Pass-Through Cover - Black (MOD-0250)
MOD-0250​
4​
MMM Molex Male Pin - 4 Pack (MOD-0121)
MOD-0121​
6​
MMM 8-Pin EPS Female Connector - Black (MOD-0098)
MOD-0098​
3​
MMM 8-Pin PCI-E Female Connector - Black (MOD-0100)
MOD-0100​
3​
MMM 4-Pin Molex Male Connector - Black (MOD-0113)
MOD-0113​
6​
MMM 22 AWG Ul1007 Hookup Wire - Black (MOD-0269)
MOD-0269​
20​

For the Crimper:

It is an old model I have always used, I think I got it from amazon or something:

Image


Motherboard -24PIN + Aluminum Combs

Image
Image


2x8 PSU Pins, combs made by me with the CNC machine (2mm thick acrylic)

Image


3x8 PCIe / GPU Cables with 24 pin combs (self-made)

Image

Image

Image


I did not like how the aluminum combs looked like on the 24 GPU pin so I changed these at the very end.


Most of my devices that use molex 4 pin connections are located at the top of the case, while the PSU is at the bottom. I did not like the idea of routing multiple molex cables from the PSU to the top so I made some custom PCBs for a molex hub board.

Soldered some molex male pins I found on aliexpress and had to convert all my molex devices from having male connector to female (as I could not find pcb-solderable molex male pins).

Image
Image


Here is the aquaero cable sleeved and converted to female-female using some headers from ModMyMods. I also made some 4-pin combs for it! The molex hub is attached with velcro from wallmart :)

Image

Image


Seamless connection from the side!

Image


Next are the pumps.
These are DDC-LT version 4 from alphacool, these fit quite nicely on the 5.25 bay from the Ascension case, but the screws are a bit high so it pushes the bay sides a bit to outside.

I will replace the pump cases with ModUltra Slammer DDC heatsinks, these were the only ones in the market with the proper height to be used with the 5.25 bays

Image

Image


Heatsinks

Image


De-soldering the pump cables and sleeving them:
Image


Had a change of heart at last moment and decided to go with full grey cables :)

Image


First pump assembled!

Image


Second Pump too:

Image


And attached to the case, here is where I realize that the molex hub was such a good idea!!

Image


And a side off-topic

I have a certification exam for what I do as a job, I am a network engineer and will be doing a CCIE wireless lab on september, a photo of some of the equipment I had to borrow to study :)

Image


Next Post - Loop will be done with some more tweaks still to go
 

Attachments

#23 ·
Now most of the stuff is sleeved and the loop is ready to be built.

Before that, I have been working around the Ascension case with the feet/wheels on it as it is a very heavy case to be moving around.... but this time the final build is coming closer and I will need to replace these, under no circumstance I will be using a case with wheels on top of my desk.

The feet I will be using, also from mountainmods:

Image

Image


Connecting the basic stuff and leak testing it for some hours

Image


Aaand it is alive!

I replaced the aluminium combs from the GPU cables as these were deforming the height of the cable way too much (the separation between holes is quite big) so I ended up making some custom combs myself again.

Here is the almost finished product!

Image

Image

Image

Image

Image

Image

Image


Image


Of course the front-panel cables and aquaero USB look horrible !! I will be working on these details next weeks!

Pending so far:

  • Optical Drive installation
  • Front Panel USB installation
  • Sleeving more molex adatpers for the 5.25 bay devices
  • Sleeving around 10 sata cables / buy something already sleeved from Corsair maybe
  • Making some special combs for these sata cables
  • Sleeving front panel cables
  • LED strips
  • Temperature Sensors and Aquasuite setup
  • Some LEDs for the reservoir
  • Creating a PSU shroud from a metal sheet, here is the design:

Image


And another keyboard I just got/built :

Nazaré 1-60
Loobed Switches Oaks / Hand Lubed
JTK Hanami Keycaps

Image


Thanks again for watching as always!
 

Attachments

#27 ·
Wow... just wow... thank you so much Alxz for showing us all what it means to be an enthusiast. These are the types of builds I log onto the forums for and draw inspiration from. This is truly a work of art, of which much detail has gone into. I haven't had the time to FULLY go through your entire build log as it is QUITE extensive lol, but definitely appreciate you documenting all the steps along the way! I too first started falling in love with Custom PCs in High school but could never afford one until my early adulthood where I was and still am budget-focused first.
Recently got back into building and pulled the trigger on an upgrade from my Ryzen 2700X/RX 580 build I had been rockin for YEARS as Micro Center just opened by me! (FINALLYYYYY, I had been praying they'd open one in FL and they did! Just 45min or so away from where I live) I ended up picking up an AM5 Bundle including the 7700x/Gigagbyte Gaming X AX V2/G. Skill 32GB 6000Mhz CL32 for $350 (fkn steal!) alongside a PNY 3080 XLR8 for $350 as well! (ty Amazon Primeday). I decided to go for it and build it in a case that immediately caught my eye in Micro Center, the Montech King 95 Pro and am LOVING the final build. I plan on doing a build log for this bad boy (or girl? still haven't decided) soon enough and I just wanted to thank you for again, bringing some great content to this forum with your build log, cheers.
 
  • Love
Reactions: Alxz